Step 1: Uninstall All Autodesk Products
Your first step should be to uninstall all Autodesk products from your computer, including the educational version of F/X CAD or AutoCAD.
Windows 10
Window 10 – 1. Select Programs and Features in your Control Panel.
|  |
Windows 10 – 3. You'll now see the Uninstall screen for your version of AutoCAD or F/X CAD.
Click Uninstall.
|  |
 |
Windows 10 – 4. Click Uninstall again.
Follow the instructions to uninstall AutoCAD or F/X CAD.
|
Windows 10 – 5. Repeat the steps listed above for all other Autodesk products you have installed.
Windows 7
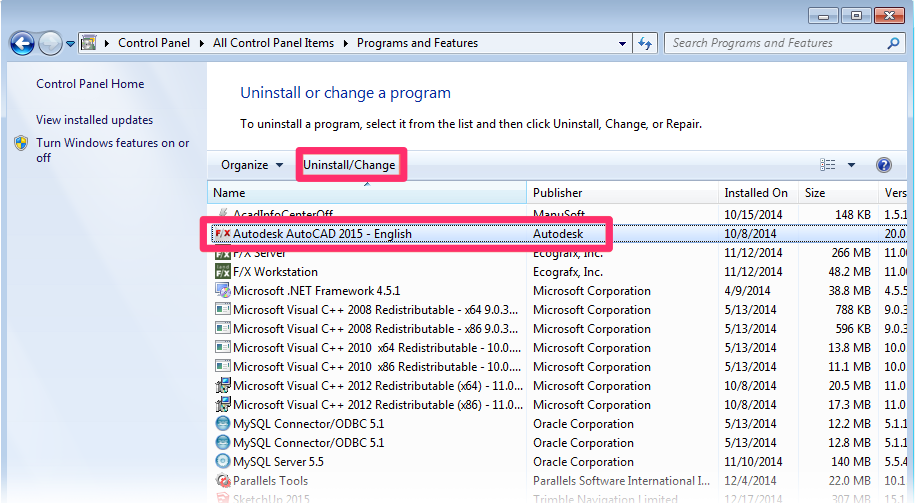
Windows 7 – 1. Select Uninstall a Program under Programs in your Control Panel.
|  |
Windows 7 – 3. You'll now see the Uninstall screen for your version of AutoCAD or F/X CAD.
Click Uninstall, and follow the instructions to uninstall AutoCAD or F/X CAD.
|  |
Windows 7 – 4. Repeat the steps listed above for all other Autodesk products you have installed.
Note: You may need to restart your computer to complete the uninstallation of some Autodesk products.
Step 2: Delete Some Specific Autodesk-Related Files and Folders
Once you've uninstalled all Autodesk products from your computer, you'll need to remove all files and folders that can potentially cause your computer to think a new AutoCAD or F/X CAD installation is still the previously installed version.
AutoCAD or F/X CAD 2017 or newer
1. Open Windows Explorer by either:
- Selecting Computer or This PC from your Start menu or
- Selecting the folder icon in the taskbar in the lower left corner of your screen
2. Find and delete the following folders. You can delete each item by right-clicking it and then selecting Delete from the menu.
C:\Program Files\Autodesk\
C:\ProgramData\Autodesk\
C:\Program Files (x86)\Autodesk\
C:\Users\**YOUR USERID**\AppData\Roaming\Autodesk\
C:\Users\**YOUR USERID**\AppData\Local\Autodesk\
3. Open the Registry Editor, and delete any subkeys from the following registry items:
HKEY_CURRENT_USER\Software\Autodesk
HKEY_LOCAL_MACHINE\Software\Autodesk
4. Follow our steps to clear your temporary files.
5. Restart your computer.
6. If you need to reinstall AutoCAD or F/X CAD, make sure your antivirus or security software is turned off when you reinstall. You can turn it back on once you've completed the installation.
AutoCAD or F/X CAD 2016 or Older
1. Open Windows Explorer by either:
- Selecting Computer or This PC from your Start menu or
- Selecting the folder icon in the taskbar in the lower left corner of your screen
2. Delete the files and folders listed below. You can delete each item by right-clicking it and then selecting Delete from the menu.
Note: You will need to turn on your hidden files and folders to see many of the files and folders listed below.
3. Find and delete the following items:
The installation folder for every Autodesk product you've had on your computer. Examples include:
- C:/Program Files/F/X CAD 20xx or
- C:/Program Files/Autodesk/AutoCAD 20xx
The folder named C:/Program Files/Common Files/Autodesk shared (The location of this item may vary depending on where you had AutoCAD or F/X CAD installed.)
Any user profile folders (substitute your login name for username):
- C:/Users/username/AppData/Roaming/Autodesk/AutoCAD 20xx
- C:/Users/username/AppData/Local/Autodesk/AutoCAD 20xx
- C:/Program Data/Autodesk/AutoCAD 20xx
All Autodesk backup files in the folder C:/ProgramData/FLEXnet
- Delete all files in this folder whose filenames start with adsk
Having trouble finding the files and folders listed above? You can search for them using the Windows Explorer search box:
|  |
Note: Don't forget to turn off your hidden files and folders once you've deleted all the necessary items.
4. If you need to reinstall AutoCAD or F/X CAD, make sure your anti-virus or security software is turned off when you reinstall. You can turn it back on once you've completed the installation.
For more information on uninstalling Autodesk products, see the official Autodesk article on the subject.
Step 3: Run a Disk Cleanup
Running the Disk Cleanup utility will ensure that you've removed all cached AutoCAD installers from your computer.
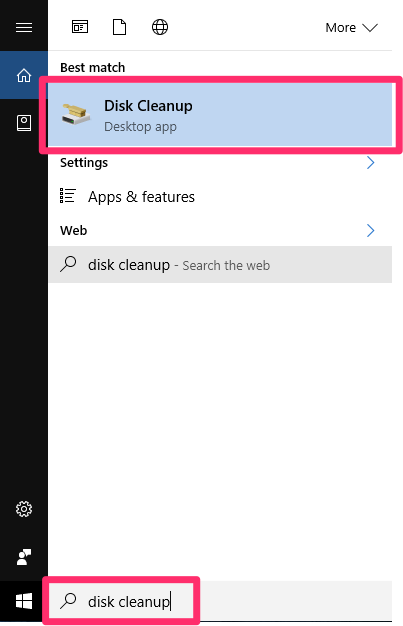
3A. Open your Start menu, and search for Disk cleanup in the search box.
Select Disk Cleanup from the list of results.
|  |
 |
3B. The disk cleanup utility will scan your computer. The Disk Cleanup dialog box will open.
Click Clean up system files.
You'll see a number of files listed under Files to delete, but you can ignore this list for now and click Clean up system files.
|
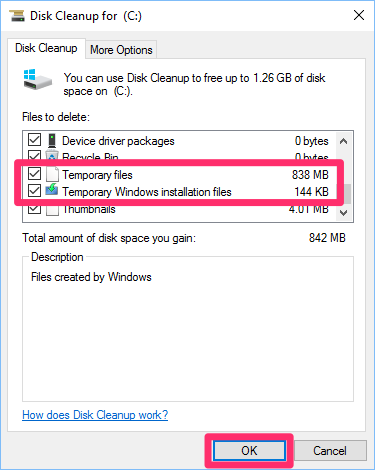
3C. The Disk Cleanup utility will scan your computer again. The Disk Cleanup dialog box will open again.
Select the file types to delete from the Files to delete list. We recommend checking all these options. At the very least, make sure the Temporary files and Temporary Windows installation filesoptions are checked.
To see a description of a file type, just select it.
Click OK. The Disk Cleanup utility will delete all cached installer files.
|  |
Having trouble removing any parts of the software? Use the Microsoft FixIt Tool to remove any components that are giving you trouble.
Step 4: Restart Your Computer & Reinstall CAD (if necessary)
Restart your computer. You've now successfully uninstalled existing versions of F/X CAD or AutoCAD.
If you need to re-install re-install F/X CAD or AutoCAD, you can do so at this time.
Problems installing? You may need to disable your antivirus software temporarily while installing AutoCAD or F/X CAD. Don't forget to enable it once the installer finishes.


No hay comentarios:
Publicar un comentario