jueves, 26 de julio de 2018

Step 1: Uninstall All Autodesk Products


Your first step should be to uninstall all Autodesk products from your computer, including the educational version of F/X CAD or AutoCAD.

Windows 10

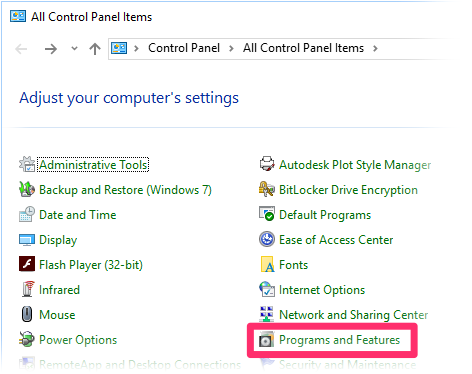
Window 10 – 1. Select Programs and Features in your Control Panel.

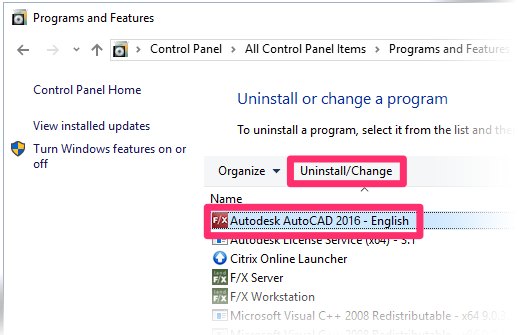
Windows 10 – 2.  Select any Autodesk product you need to uninstall, then click Uninstall/Change.
Important: If you've just installed a new version of F/X CAD or AutoCAD, you may be completing these steps to uninstall previous versions that were already on your computer when you installed. If so, do not uninstall the new version – just the previous ones.

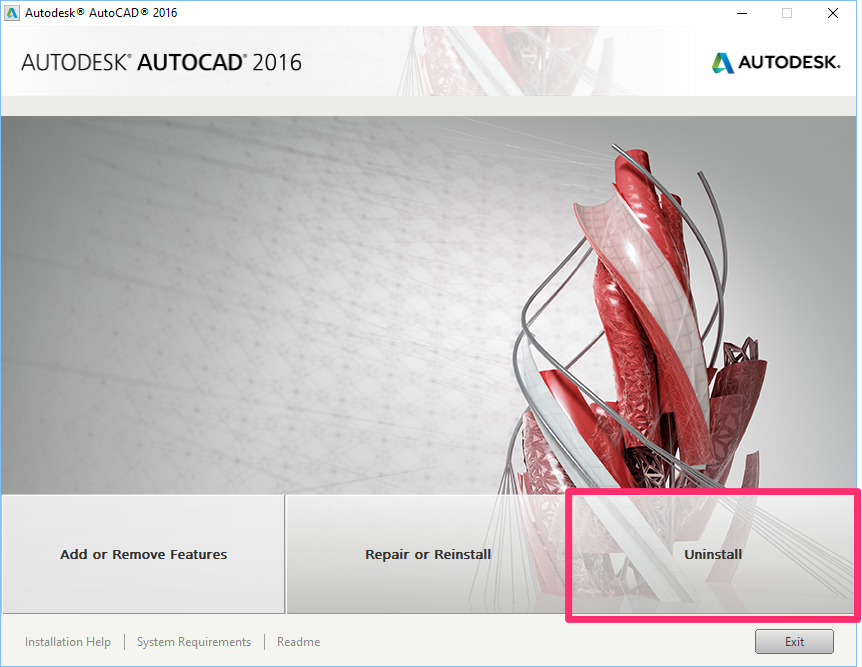
Windows 10 – 3.  You'll now see the Uninstall screen for your version of AutoCAD or F/X CAD.

Click Uninstall.

Windows 10 – 4. Click Uninstall again.


Follow the instructions to uninstall AutoCAD or F/X CAD.

Windows 10 – 5.  Repeat the steps listed above for all other Autodesk products you have installed.


Windows 7

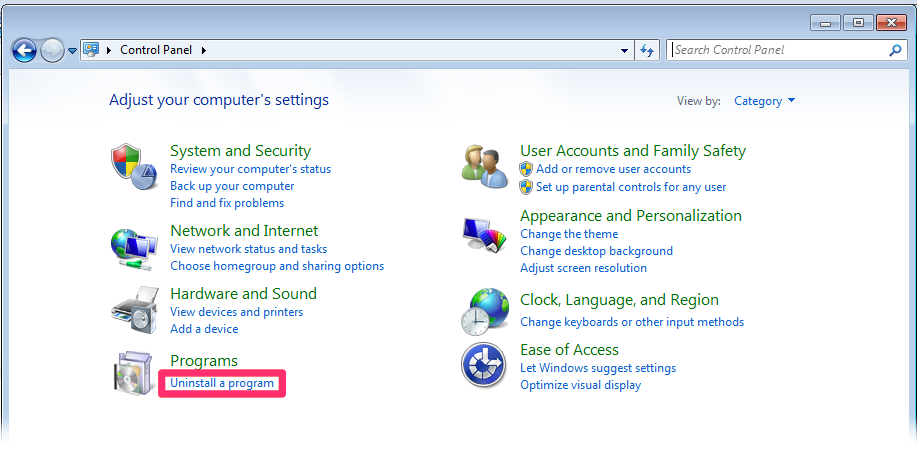
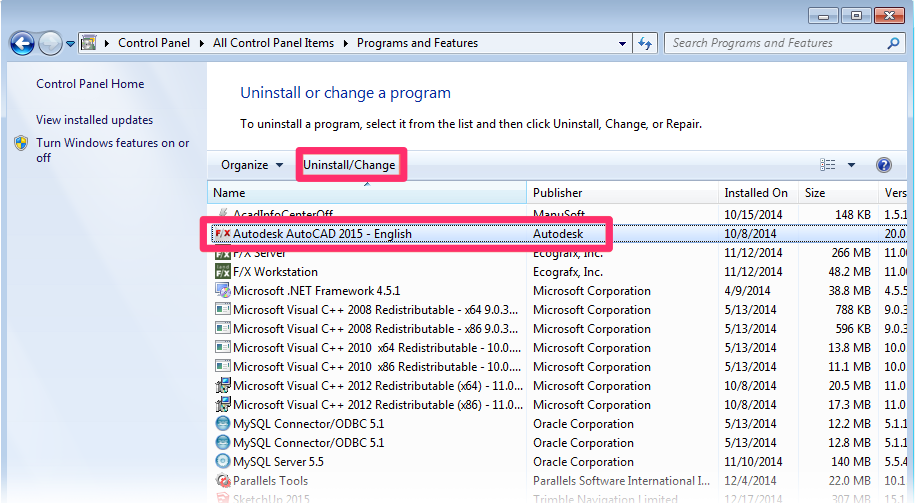
Windows 7 – 1.  Select Uninstall a Program under Programs in your Control Panel.
Windows 7 – 2.  Select any Autodesk product you need to uninstall, then click Uninstall/Change.
Important: If you've just installed a new version of F/X CAD or AutoCAD, you may be completing these steps to uninstall previous versions that were already on your computer when you installed. If so, do not uninstall the new version – just the previous ones.

Windows 7 – 3.  You'll now see the Uninstall screen for your version of AutoCAD or F/X CAD.

Click Uninstall, and follow the instructions to uninstall AutoCAD or F/X CAD.
 

Windows 7 – 4.  Repeat the steps listed above for all other Autodesk products you have installed.

Note: You may need to restart your computer to complete the uninstallation of some Autodesk products.

Step 2: Delete Some Specific Autodesk-Related Files and Folders

Once you've uninstalled all Autodesk products from your computer, you'll need to remove all files and folders that can potentially cause your computer to think a new AutoCAD or F/X CAD installation is still the previously installed version.

AutoCAD or F/X CAD 2017 or newer

1.  Open Windows Explorer by either:
  • Selecting Computer or This PC from your Start menu or
  • Selecting the folder icon in the taskbar in the lower left corner of your screen

2. Find and delete the following folders. You can delete each item by right-clicking it and then selecting Delete from the menu.
 C:\Program Files\Autodesk\
 C:\ProgramData\Autodesk\
 C:\Program Files (x86)\Autodesk\
 C:\Users\**YOUR USERID**\AppData\Roaming\Autodesk\
 C:\Users\**YOUR USERID**\AppData\Local\Autodesk\

3. Open the Registry Editor, and delete any subkeys from the following registry items:
 HKEY_CURRENT_USER\Software\Autodesk
 HKEY_LOCAL_MACHINE\Software\Autodesk

4. Follow our steps to clear your temporary files.

5. Restart your computer.

6. If you need to reinstall AutoCAD or F/X CAD, make sure your antivirus or security software is turned off when you reinstall. You can turn it back on once you've completed the installation.

AutoCAD or F/X CAD 2016 or Older

1.  Open Windows Explorer by either:
  • Selecting Computer or This PC from your Start menu or
  • Selecting the folder icon in the taskbar in the lower left corner of your screen


2.  Delete the files and folders listed below. You can delete each item by right-clicking it and then selecting Delete from the menu. 

Note: You will need to turn on your hidden files and folders to see many of the files and folders listed below.

3. Find and delete the following items:
  The installation folder for every Autodesk product you've had on your computer. Examples include:
  • C:/Program Files/F/X CAD 20xx or 
  • C:/Program Files/Autodesk/AutoCAD 20xx

  The folder named C:/Program Files/Common Files/Autodesk shared (The location of this item may vary depending on where you had AutoCAD or F/X CAD installed.)

  Any user profile folders (substitute your login name for username):
  • C:/Users/username/AppData/Roaming/Autodesk/AutoCAD 20xx
  • C:/Users/username/AppData/Local/Autodesk/AutoCAD 20xx
  • C:/Program Data/Autodesk/AutoCAD 20xx

  All Autodesk backup files in the folder C:/ProgramData/FLEXnet 
  • Delete all files in this folder whose filenames start with adsk
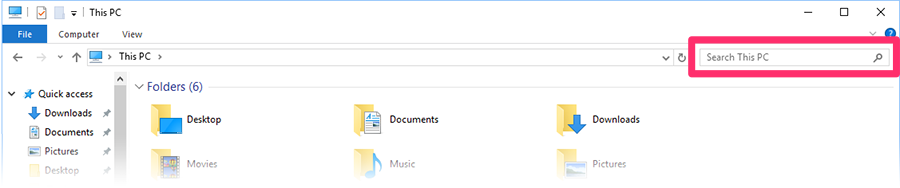
Having trouble finding the files and folders listed above? You can search for them using the Windows Explorer search box:

Note: Don't forget to turn off your hidden files and folders once you've deleted all the necessary items. 

4. If you need to reinstall AutoCAD or F/X CAD, make sure your anti-virus or security software is turned off when you reinstall. You can turn it back on once you've completed the installation. 
For more information on uninstalling Autodesk products, see the official Autodesk article on the subject.

Step 3: Run a Disk Cleanup

Running the Disk Cleanup utility will ensure that you've removed all cached AutoCAD installers from your computer.
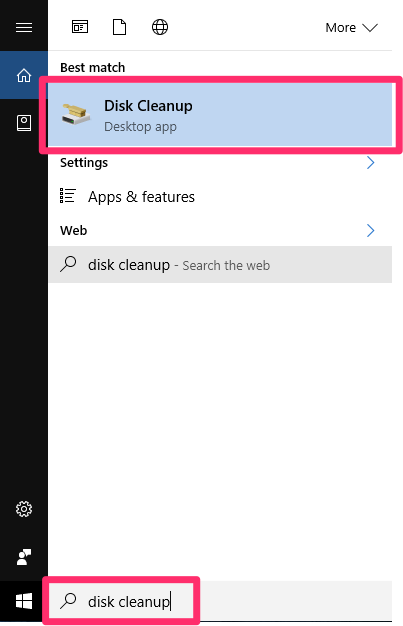
3A. Open your Start menu, and search for Disk cleanup in the search box.

Select Disk Cleanup from the list of results.


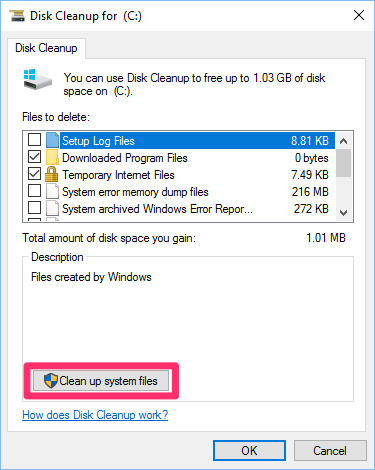
3B. The disk cleanup utility will scan your computer. The Disk Cleanup dialog box will open.

Click Clean up system files.
You'll see a number of files listed under Files to delete, but you can ignore this list for now and click Clean up system files.


3C. The Disk Cleanup utility will scan your computer again. The Disk Cleanup dialog box will open again. 

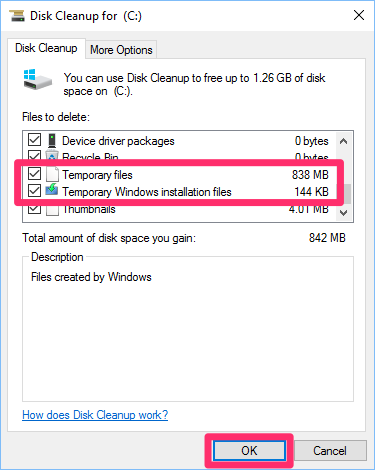
Select the file types to delete from the Files to delete list. We recommend checking all these options. At the very least, make sure the Temporary files and Temporary Windows installation filesoptions are checked. 
To see a description of a file type, just select it.
 
Click OK. The Disk Cleanup utility will delete all cached installer files.
Having trouble removing any parts of the software? Use the Microsoft FixIt Tool to remove any components that are giving you trouble.


Step 4: Restart Your Computer & Reinstall CAD (if necessary)

Restart your computer. You've now successfully uninstalled existing versions of F/X CAD or AutoCAD.

If you need to re-install re-install F/X CAD or AutoCAD, you can do so at this time. 
Problems installing? You may need to disable your antivirus software temporarily while installing AutoCAD or F/X CAD. Don't forget to enable it once the installer finishes.

miércoles, 12 de julio de 2017

RAID en Servidores un poco viejitos

Estimados alumnos, aquí les va un material que estoy seguro podrán sacarle provecho, aquí les indico como realizar un RAID usando Windows 2012 server, con controladoras no soportadas por Windows 2012; les recomiendo leer detalladamente para mejor comprensión y no perder el propósito del proyecto de clase.

Tomado del link: http://en.community.dell.com/techcenter/os-applications/w/wiki/4311.dell-software-raid-controller-support-for-microsoft-windows-server-2012


Dell Software RAID Controller Support for Microsoft Windows Server 2012


Dell provides cost effective RAID support through PERC (PowerEdge Raid Controller) S100, S300 and S110. At present Dell supports only S110 controllers with Windows Server 2012. For S110 controller download and install the latest drivers from support.dell.com. Customers who are using Dell servers with PERC S100 and S300 controllers have to switch to one of the below alternate options if they want to install Microsoft Windows Server 2012 on their servers.

Option1: Converting PERC S100 into on-board SATA controller
Note: No data is migrated and this is not a replacement of PERC S100 solution. Data needs to be backed up before following the below steps.
  1. Power on the server and press F2 to enter the BIOS settings.
  2. Enter the BIOS setup -> SATA settings option and change it to ATA or ACHI mode whichever is available. Refer Figure-1.
  3. Save and Exit the setup.
  4. Boot from the Microsoft Windows Server 2012 DVD and complete the installation.

Option2: Switching to on-board SATA controller from PERC S300
Note: No data is migrated and this is not a replacement of PERC S300 solution. Data needs to be backed up before following the below steps.
  1. Open the server and remove the internal SATA cables connected to the S300 controller and connect it to the On-Board SATA controller ports of the server.
  2. Power on the server and press F2 to enter the BIOS settings.
  3. Enter the BIOS setup -> SATA settings option and change it to ATA or ACHI mode whichever is available. Refer Figure-1.
  4. Save and Exit the setup.
  5. Boot from the Microsoft Windows Server 2012 DVD and complete the installation.
Figure-1 : BIOS Setup Screen

Option 3: Buying a new supported PERC controller from Dell
You can purchase additional supported RAID controllers via the spare parts sales teams with a phone call to Dell or you can also order online via the S&P sales catalog.  To order online, go tohttp://accessories.dell.com and search for “PERC”.

Microsoft Windows Server 2012 provided RAID solution:
Installing Microsoft Windows Server 2012 utilizing the on-board SATA controller doesn’t provide data redundancy. In the event you want data redundancy, you can use the software raid functionality provided by the Microsoft Windows Server 2012 operating system.
  1. Go to disk management.
  2. Right click on the disks and convert it to dynamic disk.
  3. Right click on the volume for which you want redundancy and create “Mirrored Volume” or “RAID-5 volume”
Note: Redundancy can be provided for both data and operating system volume but the latter supports only “Mirrored Volume”. For more information about using operating system raid solution refer to Microsoft documents

domingo, 9 de julio de 2017

Ls ventajas de RAID 0, 1 y 5

Mis estimados estudiantes, me consultaron sobre la configuración de los Arreglos de Discos, la tarea asignada consiste en crear un arreglo de Disco de RAID 1 (para la redundancia de la información en los 2 discos), pero aquí les dejo parte de la teoría que deben conocer.   Recuerden para entrar a los modelos DELL es con CONTROL + R,  
Y finalmente recuerden configurar el CACHING POLICY en modo NONE, pues sugiero que sea ésta pues la batería podría fallar en cualquier momento y podrían perder la configuración del RAID.

Las ventajas de RAID (RAID 0 vs. RAID 1 vs. RAID 5)

Ventajas de RAID
RAID es el acrónimo de “Matriz redundante de discos independientes” (Redundant Array of independent Disks). Con RAID habilitado en un sistema de almacenamiento, usted puede conectar dos o más unidades de disco en el sistema para que funcionen como un solo disco grande y rápido, o bien, los puede configurar para que uno de los discos del sistema se utilice para duplicar (o ser el espejo) automática e instantáneamente sus datos para un respaldo en tiempo real.
Existen tres razones por las que puede querer un sistema con discos RAID.
Porque necesita enorme espacio de almacenamiento y necesita que sea rápido. (RAID 0)

Desea respaldar sus datos de forma instantánea y automática. (RAID 1)

Desea ambas cosas. (RAID 5)
¿Cuál modo de RAID debo utilizar?
1. Velocidad (RAID 0)
Configurado en el modo de alto rendimiento (llamado también modo de bandas o RAID 0), el sistema de almacenamiento le proporciona el poder que necesita si usted trabaja en:
Diseño de enormes gráficos y necesita un espacio de trabajo para Photoshop con velocidad de relámpago.
Grabación de grandes archivos DV mientras conserva un rendimiento limpio de audio.
Edición de DV o video HD y desea un flujo de trabajo continuo, sin pérdida de cuadros de video.
Visualizar complejos objetos o efectos especiales en 3D.
Realiza operaciones de bases de datos con uso intensivo del disco.
Ser el primero en su calle con una computadora tan rápida que los dejará con la boca abierta.
¿Por qué es tan rápido RAID 0? Es un poco complicado, pero basta decir que dos o más cabezas, o en este caso, unidades de disco, son mejor que una. Imagínese varias mangueras llenando un balde al mismo tiempo o varias personas achicando agua de un bote y podrá entender porqué dos discos en banda son más rápidos que uno solo. Los datos se guardan en ambos discos y todos los discos acceden a ellos en paralelo, por lo que obtiene mayores tasas de transferencia en grandes accesos de datos y mayotes tasas de entrada/salida en pequeños accesos de datos.
2. Protección de datos (RAID 1)
Configure el sistema para el modo de protección de datos (conocido también como modo de espejo o RAID 1) y la capacidad se divide a la mitad. La mitad de la capacidad se usa para guardar sus datos y la otra mitad se usa para una copia en duplicado.
¿Y para qué quiero esa clase de redundancia? Son sus datos. Las fotos de su familia, la película de los primeros pasos de su bebé, su primera novela. ¿Son importantes? Usted decide. Si lo son, entonces el modo espejo de RAID es adecuado para usted.

. Protección de datos y velocidad (RAID 5)
en sistemas con tres o más unidades (como nuestro Sistema de almacenamiento en red WD ShareSpace™ de 4 TB) le recomendamos configurar el sistema a RAID 5. Esto le proporciona lo mejor de ambos mundos: un rendimiento rápido al guardar los datos en todas las unidades de disco; protección de los datos al dedicar un cuarto de cada unidad a la tolerancia a las fallas, dejando tres cuartos de la capacidad del sistema disponibles para almacenamiento de datos.
Acerca del Spanning o distribución (Lineal)


La técnica de extendido, que no es un modo RAID, combina todas las unidades de un sistema en un solo gran volumen que funciona como una unidad de disco gigante. Las unidades se llenan una unidad a la vez. La ventaja de usar este modo es que puede agregar más unidades sin tener que reformatear el sistema.

miércoles, 8 de febrero de 2017

A display driver file (.hdi) is missing or has been corrupted" when launching AutoCAD

the answer to your problem is already given.
Please read the comment of Yehosef

Finally achieved after many attempts to fix the problem with that stupid
error autocad 2014

and is easier than it seems

1. - Open the registry you type Win + R enter regedit
2. - "Ctrl + F" we all entries "CustomHeidiDriverPath" and remove the value
assigned to this entry
C: \ Program Files \ Autodesk \ AutoCAD 2014 \ Drv \

attentively

yehosef


missing or corrupt display driver hdi
Autocad 2014
________________________________________________________________


Finalmente despues de muchos intentos logre solucionar el problema con ese
estupido error del autocad 2014

y es mas sencillo de lo que parece

1.- abrir el registro Win+R enter tecleamos regedit
2.- "Ctrl +B" buscamos todas las entradas "CustomHeidiDriverPath" y
eliminamos el valor asignado a esta entrada
C:\Program Files\Autodesk\AutoCAD 2014\Drv\

atentamente
yehosef

missing or corrupt display driver hdi
Autocad 2014

Esto me pasó con AutoCad 2014

Quizás este post esté un poco desfasado pero un alumno me pidió algo referente a este problema  y ahora lo comparto:

ERROR DEL AUTOCAD 2014.

"EL SISTEMA DE SEGURIDAD(Administrador de licencias con bloqueo mediante software)"

Y por consecuencia no podía acceder ni entrar al AutoCad.

SOLUCIÓN:

1) Cerrar todo el AUTOCAD 2014
2) Detener todos los procesos de AutoDesk (desde el Administrador de Tareas)
3) Buscar desde el Explorador de Windows el archivo:  ******tsf.data y su backup de la carpeta oculta c:\ProgramData\FLEXnet

Borrarlo definitivamente y finalmente volver a cargar su Crack con el procedimiento normal.

Espero te sirva, compártelo!!!